Windows 10 is capable of recognizing and automatically adding printers on your home network that use the Universal Plug and Play (UPnP) protocol. However, if due to some reason your Printer does not show up or is an older printer that is not UPnP capable, then you can attempt to add that Printer to Windows 10 manually.
How To Install and Configure printer Windows 10
Like its predecessors, Windows 10 also supports different types of printers. You can add a local printer, shared Printer, add a printer using TCP/IP address, add a Bluetooth, wireless or network discoverable printer, or add a local/network printer with manual settings. Here How To Install and Configure Printer in Windows 10.
1 How To Install and Configure printer Windows 101.1 Local printer Vs. Shared Printer Vs. Network printer1.2 Add Local Printer in Windows 101.3 Windows Fails To Detect Your Printer1.4 Add Network Shared Printer1.5 Install Network Printer1.6 Add a Wireless Printer
Local printer Vs. Shared Printer Vs. Network printer
Add Local Printer in Windows 10
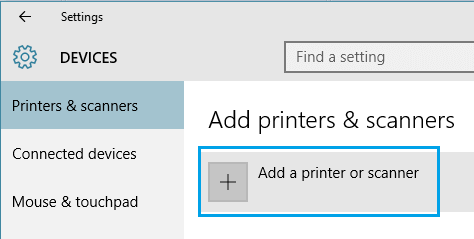
Looking for manually Add A local Printer on Your windows 10 computer. First Note down the printer model number, Then visit the printer manufacturer website and download the suitable driver for your Printer. Otherwise, if you have a new printer then a driver installation You will find on box pack. Download the driver and save it to a folder or copy the printer driver from media drive which you receive from the printer box. Now First, connect the Printer to your computer using a USB cable, And Turn on the Printer using its power button. Next, On your computer, click on the Start button -> choose Settings -> click on Devices -> Printers & Scanners, Then click on Add a Printer or Scanner options As shown below image.
When you click on ‘Add Printer or Scanner’ Windows 10 will start scanning for connected printers and should automatically detect your Printer. Once connected Printer will appear in the scan results, click on the name of the Printer and follow the instructions (On screen) to finish the installation of the local Printer.
Windows Fails To Detect Your Printer
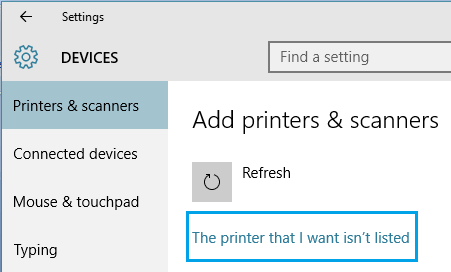
If In certain cause Windows may not be able to detect the connected Printer, follow the steps below to find your connected Printer. Click on The Printer that I want isn’t listed link.
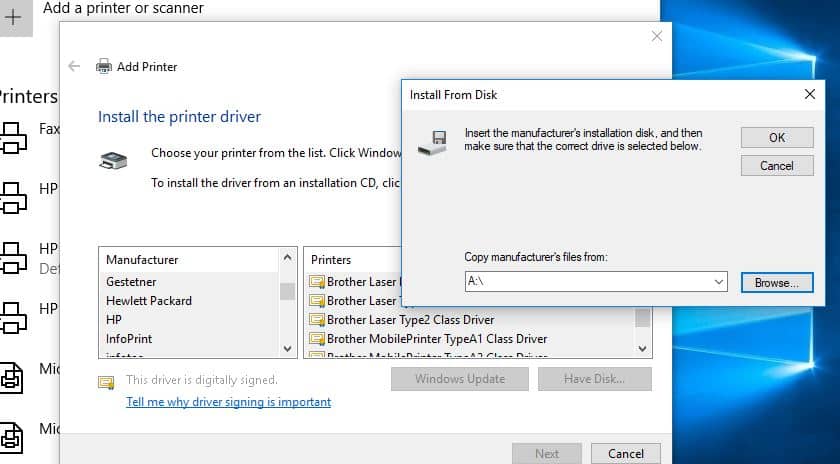
On the next screen, select “Add a local printer or network printer with manual settings” and click Next.
On Next Screen Select Use an existing port and click next. Now select the printer manufacturer and printer model number, If your Printer not listed select on Have Disk and select the driver path which you download before.
Click next and follow onscreen instructions to complete the installation of the Printer. In the next few windows, you will be asked to provide a name for the Printer (enter a descriptive name). You will also be able to choose whether you want to share this Printer with others on the network. Finally, the printer setup Wizard will let you print a text page (optional) and you can click on Finish to complete the printer installation.
Add Network Shared Printer
You can Share the locally installed Printer and Access it from Other computers for printing purposes. First Right Click on the local installed Printer select properties. Move to Sharing Tab and tick on share this printer option as shown below image. Click on Apply and ok to make save changes.
Then After To Access the Shared Printer Simply note Down the computer name or IP address of the computer where the shared Printer is installed. You can check the computer name by right click on This pc and select properties. Here on System properties look for computer name and note down it. Also, you can check the IP address from Command prompt type ipconfig and hit the enter key. Now To Access the Shared Printer On the different computer on same network Press Win + R, Then type \computer name or \IPAddress Of the computer where the local shared Printer is installed and hit enter key. If ask for Username password type the username and password of the computer where the Printer is installed. Then right click on the Printer and select connect to install and connect shared Printer on the local network.
Install Network Printer
Local Printer having only one USB port so you can only install only one PC using USB port but Network Printer are different, It has a special network port with one USB port. you can either connect through USB port or you can connect your network cable to Ethernet port. To Install and configure a Network printer First, connect the network cable, Then open Printer settings -> IP address and Set the IP address of your local network. For example: If your Default gateway / Router Address is 192.168.1.1, then Type 192.168.1.10 ( you can replace 10 with your chosen number between 2 To 254 ) and ok to make save changes. Now to install the Network printer on Windows 10 First download printer driver from the manufacturer website and run the setup.exe or you can insert the printer driver media which come with printer box to DVD drive and run the setup.exe. While select install option, Add a network printer. Also you can open Control panel -> device and Printer -> Add a printer option on top of the window -> On add a device wizard select the Printer that I want isn’t listed -> Select radio button add a Bluetooth, wireless or network discoverable Printer and follow on-screen instruction to install the Printer.
Add a Wireless Printer
To add a wireless printer on Windows 10, Use the Printer’s LCD panel to enter the wireless setup. For Example, you are using Epson printer this is under Setup > Wireless LAN Settings. Next, select your Wi-Fi network. You’ll need to know your home network’s SSID, which you can find by hovering your mouse over the Wi-Fi icon in the taskbar. Enter your network password. In some cases, you might need to temporarily connect your Printer to your computer via USB to install the software. But otherwise, that’s it. You should find your Printer automatically added in the Printers & scanners section under Settings > Devices. If you run into trouble, make sure your Printer is relatively close to your computer and not too far from your wireless router. If your Printer has an Ethernet jack, you could also connect it directly to your router and manage it with a browser interface. These are some basic Steps To install and configure Printer On Windows 10 computer. I hope after reading this you can easily install and configure a Local printer on Windows computer, Share a printer for access from a different computer, Add a shared printer, Add a network and wifi Printer on Windows computer. Still, have any query, suggestion Feel free to comment below. Also, Read
How To Fix Default Printer Keeps Changing in windows 10Solved: WiFi Keeps Disconnecting After Windows 10 1809 updateFix DHCP is not enabled for wireless network connectionFix USB Device Not Recognized Error on Windows 10How To Fix Windows 10 internet connection problems