Fix couldn’t create a new partition error 0x8004240f
Installing Windows 10 on a PC or Laptop is very easy and simple. All you have to do is download Windows 10 ISO, create a bootable USB drive, insert it, and follow the on screen wizard. While installing, Windows 10 asks you to select a partition. Generally, you just select a desired partition or disk from the list and Windows will do the rest of the job. But sometimes users reported Failed to Create a New Partition“We couldn’t create a new partition” error message while installing Windows 10. This error might happen for any number of reasons, even on perfectly functioning SSDs and HDDs. Here fallow bellow solutions to fix this couldn’t create a new partition error 0x8004240f.
1 Fix couldn’t create a new partition error 0x8004240f1.1 Disconnect Additional Hard Drives1.2 Make Partition Active
Disconnect Additional Hard Drives
Start with the Basic solution disconnect all hard drives except the primary hard drive where you install Windows. Once you disconnect all your other hard drive(s), try to install Windows again and see if you can proceed with the installation. Other than the actual Windows 10 bootable USB drive, if you have any other USB drives and memory cards connected to your system, then on rare occasions Windows might confuse these drives for regular hard drives. Disconnect those additional USB drives or memory cards and try installing Windows again. Note: Bellow solutions completely Delete all Data on your Disk Drive. We recommend backup your important data before apply the bellow solutions.
Make Partition Active
In order to fix “We couldn’t create a new partition” error message while installing Windows 10, experts advise that you set the desired partition as primary. You can do this using diskpart tool. First Start Windows 10 setup using bootable USB or DVD. Skip the first screen and on the next screen click on Repair your computer option as shown below image.
Click on Troubleshooting Choose Advanced tools and then select Command Prompt.
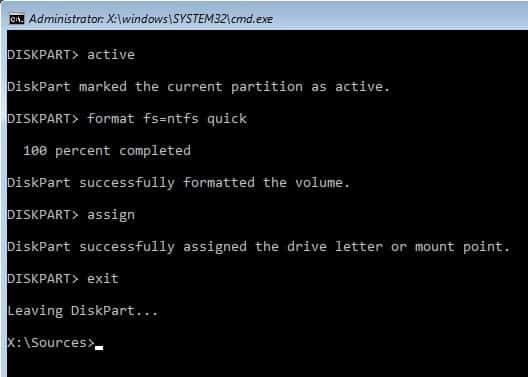
The above action will open the command prompt. Here type diskpart and press Enter. This opens the diskpart utility so that you can make the partition active. Now, use the following command to list all the disks on your system. After listing all the disks, find the disk you want to install Windows in. In my case the disk number is “0.” Type the following command to select the disk: Dn’t forget to replace “0” with your actual disk number. To clean the selected disk: To make the disk primary, run the command Activate the partition: After activating, type to format it in the NTFS file system.
Now you can assign the disk by executing the command That’s it, execute the exit command twice to close the diskpart utility and command prompt. After closing the command prompt, restart your machine and try to install Windows again. I hope After applying the above solutions error We Couldn’t Create A new Partition Or Locate the Existing One see the setup log files or we couldn’t create a new partition error 0x8004240f or 0x80042468 get resolved. And the system allows to create a new partition to install windows 10 Successfully. Still have any query, suggestion or face any difficulty while apply the above solutions feel free to discuss on comments below. Also Read
5 Tweaks to fix Slow Boot Times in Windows 10 (Updated )Solved: Windows 10 High CPU usage after update!Fix windows license will expire soon windows 10How to Make Google Chrome Faster on Windows 10, 8.1 and 7 Solved: Microsoft Outlook Error 0x8004010F “Data File Cannot Be Accessed”

